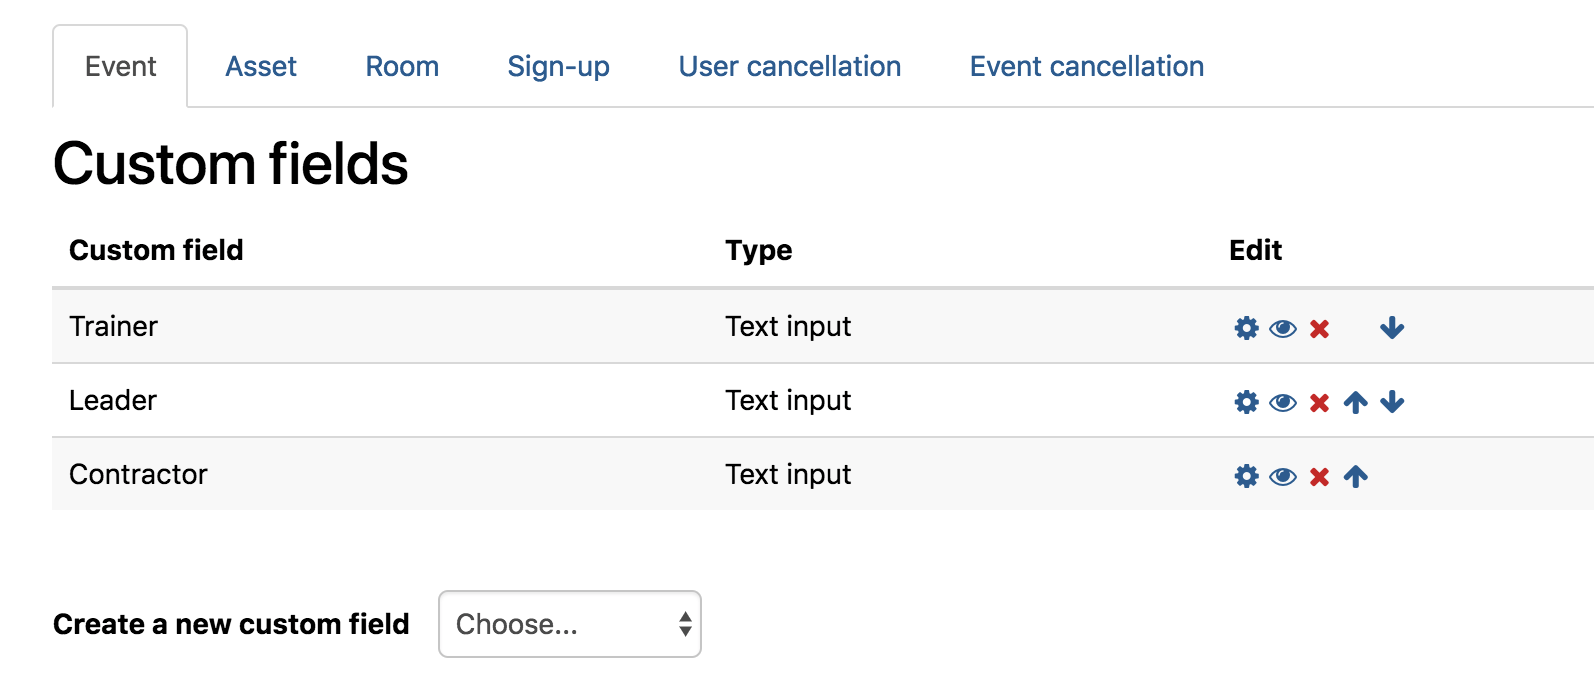
In a similar way that Users and Courses have custom fields, Totara has now included the option to add custom fields to the different screens, resources and assets associated with the Seminar activity. These fields are added by visiting Site Administration › Seminars > Custom Fields within your Totara LMS site. You can then create new custom fields with a variety of different types, across the different areas associated with the Seminar activity (see below).
Please note, custom fields and the Seminar activity are only available in Totara 9 and above. Seminars were added in Totara 9 as an enhanced and rebranded version of the Face to Face activity and so this guide will not work for older versions of Totara LMS.

Once you have created the custom fields to use as part of your Seminar sessions, you can start building the Zoola report that will include this information. For the purposes of this case study, we will add a Derived Table to the Seminar Expanded Data Source, which already includes many of the necessary tables associated with Seminars, sessions and attendance.
To begin, you will need to copy the Seminar Expanded Data Source from the Public folder into your private organizational folder tree. To copy the Seminar Expanded Data Source, complete the following steps:
1. From the Zoola landing page, select Data Sources > View Existing.
2. Locate Seminar Expanded Data Source, right-click and select Duplicate. This will create a new Data Source directly under the original Seminar Expanded Data Source with a (1) appended to the end.
Now that you have an editable copy of the Seminar Expanded Data Source, you can edit it to add the necessary Custom Fields through a Derived Table.
3. Right-click the new Seminar Expanded Data Source and select Edit. The Edit Data Source page opens.
4. Underneath the Data Source Design heading, click the Edit with Data Source Designer link. The Data Source Designer opens to the Display tab.
5. Navigate to the Derived Tables tab.
On the Derived Tables tab you will need to add in all the custom fields that you want to use as part of your Zoola report. Totara features six different custom field options for the Seminar activity. You will need to create a derived table for each of the custom field types that you would like to add to your report.
6. In the Query ID field, enter the table name according to the derived table queries, listed below in the Custom Field Derived Table section of this document.
7. In the Query field, copy and paste in the appropriate SQL statement defined in the Custom Field Derived Table section list below in this document.
8. Once you have added the SQL, click the Run Query button to validate the query
9. If your query runs successfully, click the Save Table button to create the new derived table. You will need to do this for each custom field type e.g. Event, Asset, Room, etc, that you are looking to add you to the report.
Copy and paste the following information into the derived table area of the Data Source creator.
Please note these SQL queries will need to be edited according to the custom fields that you are looking to add to your report. To do this locate your Seminar custom fields in Totara. You will now need to map the custom field information into the SQL queries listed below.
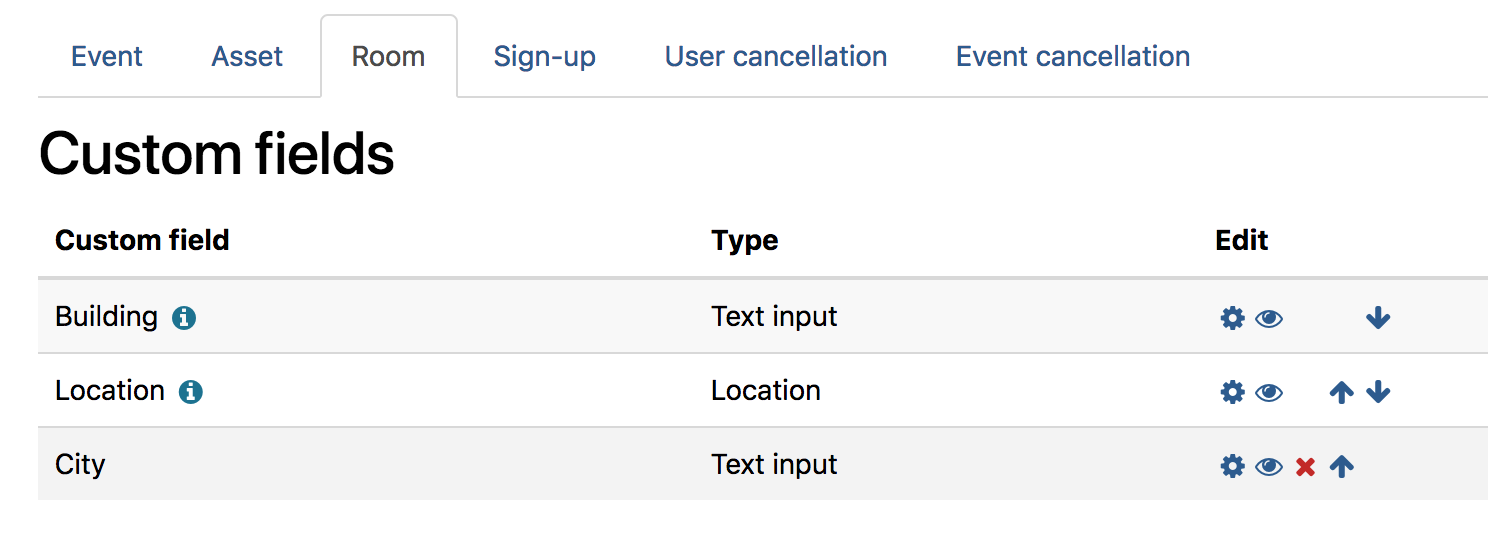
For example, in our demo site the Room custom fields currently have the following fields: Building, Location and City

To do this you will need to copy the Room Query (query id: room_info_data) and add in the name and field ID information. The query currently looks like this, according to this document.
SELECT mfr.id AS 'room_id', |
To map your custom profile field information into this document you will need to make the following adjustments, highlighted in ORANGE and BLUE.
SELECT mfr.id AS 'room_id', |
This process can be applied to any of the of the other custom fields, making adjustments to the SQL query as needed to accommodate the different fields. Please note this process assumes that the fields are in the order that they were originally created within the Seminar custom profile area. If you find that the names and values are not aligning correctly try adjusting the fieldid=# value to another number. This number refers to the id number associate with the custom fields.
SELECT mfs.id AS 'session_id', mfsid1.data AS '##EVENT FIELD 1##', mfsid2.data AS '##EVENT FIELD N##' FROM mdl_facetoface_sessions mfs LEFT OUTER JOIN mdl_facetoface_session_info_data mfsid1 ON (mfs.id=mfsid1.facetofacesessionid and mfsid1.fieldid=1) LEFT OUTER JOIN mdl_facetoface_session_info_data mfsid2 ON (mfs.id=mfsid2.facetofacesessionid and mfsid2.fieldid=2) |
SELECT mfa.id AS 'asset_id', mfaid1.data AS '##ASSET FIELD 1##', mfaid2.data AS '##ASSET FIELD N##' FROM mdl_facetoface_asset mfa LEFT OUTER JOIN mdl_facetoface_asset_info_data mfaid1 ON (mfa.id=mfaid1.facetofaceassetid and mfaid1.fieldid=1) LEFT OUTER JOIN mdl_facetoface_asset_info_data mfaid2 ON (mfa.id=mfaid2.facetofaceassetid and mfaid1.fieldid=2) |
SELECT mfr.id AS 'room_id', mfrid1.data AS '##ROOM FIELD 1##', mfrid2.data AS '##ROOM FIELD N##' FROM mdl_facetoface_room mfr LEFT OUTER JOIN mdl_facetoface_room_info_data mfrid1 ON (mfr.id=mfrid1.facetofaceroomid AND mfrid1.fieldid=1) LEFT OUTER JOIN mdl_facetoface_room_info_data mfrid2 ON (mfr.id=mfrid2.facetofaceroomid AND mfrid2.fieldid=2) |
Sign-Up
SELECT mfs.id AS 'Signup_id', mfsid1.data AS '##SIGN-UP FIELD 1##', mfsid2.data AS '##SIGN-UP FIELD N##' FROM mdl_facetoface_signups mfs LEFT OUTER JOIN mdl_facetoface_signup_info_data mfsid1 ON (mfs.id=mfsid1.facetofacesignupid AND mfsid1.fieldid=1) LEFT OUTER JOIN mdl_facetoface_signup_info_data mfsid2 ON (mfs.id=mfsid2.facetofacesignupid AND mfsid2.fieldid=2) |
SELECT mfs.id AS 'signup_id', mfcid1.data AS '##USER CANCELLATION FIELD 1##', mfcid2.data AS '##USER CANCELLATION FIELD N##' FROM mdl_facetoface_signups mfs LEFT OUTER JOIN mdl_facetoface_cancellation_info_data mfcid1 ON (mfs.id=mfcid1.facetofacecancellationid AND mfcid1.fieldid=1) LEFT OUTER JOIN mdl_facetoface_cancellation_info_data mfcid2 ON (mfs.id=mfcid2.facetofacecancellationid AND mfcid2.fieldid=2) |
SELECT mfs.id AS 'session_id', mfscid1.data AS '##EVENT CANCELLATION FIELD 1##', mfscid2.data AS '##EVENT CANCELLATION FIELD N##' FROM mdl_facetoface_sessions mfs LEFT OUTER JOIN mdl_facetoface_sessioncancel_info_data mfscid1 ON (mfs.id=mfscid1.facetofacesessioncancelid AND mfscid1.fieldid=1) LEFT OUTER JOIN mdl_facetoface_sessioncancel_info_data mfscid2 ON (mfs.id=mfscid2.facetofacesessioncancelid AND mfscid2.fieldid=2) |
Now that the tables have been created you will need to join them into the data source so they can be used by reports.
10. Navigate to the Joins tab and add the following joins according to the derived tables and custom fields that you would like to add.
| Left Table | Field | Join Type | Right Table | Field |
|---|---|---|---|---|
| mdl_facetoface_sessions | id | LEFT OUTER | event_fields | session_id |
| mdl_facetoface_asset | id | LEFT OUTER | asset_fields | asset_id |
| mdl_facetoface_room | id | LEFT OUTER | room_fields | room_id |
| mdl_facetoface_signups | id | LEFT OUTER | signup_fields | Signup_id |
| mdl_facetoface_signups | id | LEFT OUTER | user_cancellation_fields | signup_id |
| mdl_facetoface_sessions | id | LEFT OUTER | event_cancellation_fields | session_id |
Finally we need to add the custom fields to the Data Source so they are available with the Ad Hoc View builder.
11. Navigate to the Display tab.
12. In the Resources panel, select to View as: Join Tree.
13. Expand JoinTree_1, then expand the event_fields / asset_fields / room_fields / signup_fields / user_cancellation_fields / event_cancellation_fields table:
14. Select the relevant field(s) and drag it into the appropriate set in the Sets and Items panel.
15. Click the OK button to save your changes in the Data Source Designer and return to the Edit Data Source page.
16. Under the Required Information heading, rename the Course Enrollments Data Source in the Name field, in order to avoid confusing it with the Public Course Enrollments Data Source. We will call this Data Source the "CompanyABC Course Enrollments Data Source".
17. To save your changes to the Data Source, click the Submit button